Showing posts with label side dish. Show all posts

Thursday, May 10, 2012

Bacon and Green Beans

We have been trying to eat more veggies lately. Often when we think of quick foods, it is something that comes in a box and all we have to do is add water and presto... deliciousness. This is one quick go to recipe that my kids have really enjoyed.


Bacon and Green Beans

Fresh Green Beans (not canned)
Bacon
Onions
Sliced Almonds (optional)

I use the fresh green beans from Costco. Before you start, rinse them and chop
off the ends. Let them dry on a kitchen towel so there won't be any water
added to the bacon or it will splatter.

Use as much or as little bacon as you like. I usually go a little heavy as
my family really likes bacon. Cut it into pieces and start cooking it in a pan. When it starts
getting close to done, add chopped onions. Again this is a preference thing. Lets give it
a ration of 1/3 lbs bacon to 1/2 of a medium chopped onion. Cook until onions are
getting soft and translucent. Bacon should "almost" done, but not quit. After a couple
of attempts you will find when you like adding each ingredient. Drain off as much
bacon grease as you want.

Add green beans and cook in pan (you can add a lid to help them cook).
This is also when you would add your almonds if you desire. Stir periodically 
until they are done to your liking. We like ours with a bit of crunch.
Serve warm.

Monday, June 6, 2011

Honey Roasted Red Potatoes

We were invited to a friend's house for dinner. I asked what I could bring, she said "How about a potato dish?". Of course you can never go with the same old thing, so I found this recipe and we really enjoyed it. I like something that takes just a little preparation, pop it into the oven with little maintanence and in a bit of time you have a yummy dish. I thought this would be good for summer with all the grilling that goes on. Honey Roasted Red Potatoes 1 lb Red Potatoes 2 Tablespoons diced Onion 2 Tablespoons Butter 1 Tablespoon Honey 1 teaspoon Dry Mustard 1 pinch of Salt 1 pinch of ground black pepper Heat over to 375 degrees. Cover 11 X 17 pan with foil which has been sprayed with cooking spray. Wash and dry potatoes, then cut into cubes. Spread on pan then sprinkle onions over the top. Mix butter, honey, dry mustard, salt and pepper in a bowl then drizzle over the top. Mix so all the potatoes are covered. Cook for 35 minutes or until potatoes are tender. I ended up doing 5 lbs of potatoes because there were quite a few people eating (so I mutltiplied the recipe by 5). I would cut down on the butter by about maybe half as they did end up a just a little greasy. Delicious, but a bit greasy :) I added more onion than called for because I loved carmalized onion and potatoes. You could do them in a little bigger chunks than diced. I stirred every 15 minutes or so and I ended up cooking mine for a little over an hour. I like them a little brown and carmalized. Sprinkle a little extra salt and pepper at the end to taste.

Monday, May 23, 2011

Raspberry Applesauce Jello

This is from my mom and I have had to ask her for it several times. So to save her the headache of finding it one more time, I posted it here for easy access. Also, thought it would be good to share with berry season closing in on us. I love the texture the applesauce adds to this. Definitely a favorite of our family... and easy. Raspberry Applesauce Jello 3 (3 oz) packages raspberry Jello 3 cups 7-up (you can mix water with the 7-up to make 3 cups) Applesauce Lots of Raspberries (about 3 packages frozen) Boil 7-up then add jello slowly, stirring until desolved. Add enough applesauce to make 6 cups. Pour into a 9 X 13 pan. Add lots of raspberries (to your liking). Chill for 3-4 hours or until set. You can top with Cool Whip if you want. Easy!

Thursday, May 19, 2011

Chicken Salad

A few things I love about summer are BBQing, fresh fruits and vegetable, and yummy salads. This is one of my favorites. In fact my sister, Wendi, and I had a chicken salad cookoff. We were so sure everyone woule like ours the best that we both ended up doubling our recipes. Needless to say we had PLENTY of chicken salad. That, and I am sure I was the hands down winner :) This recipe is from a friend our family has known for quite a while. She is a fantastic cook. You know the type. When she has a recipe you know you want a copy because there isn't anything that she makes that isn't wonderful. Thanks Marilyn! Chicken Salad 3 cups chicken, cooked and cubed (I think you could use your canned chicken too) 1 cup grapes (red or green) 1 cup slivered almonds 3 cups celery (I use less as my family aren't celery fans) 1 cup mayonnaise 1/4 cup whipping cream, whipped (love the creaminess this adds) 1 Tablespoon lemon juice salt and pepper to taste Mix he chicken, grapes, almonds and celery. Mix mayonnaise, whipped cream and lemon juice. Fold into chicken mixture and serve on lettuce leaves or croissants. Taste it before serving and add whatever salt and pepper you want to your liking. Yummy! Making this Saturday for lunch!

Tuesday, December 1, 2009

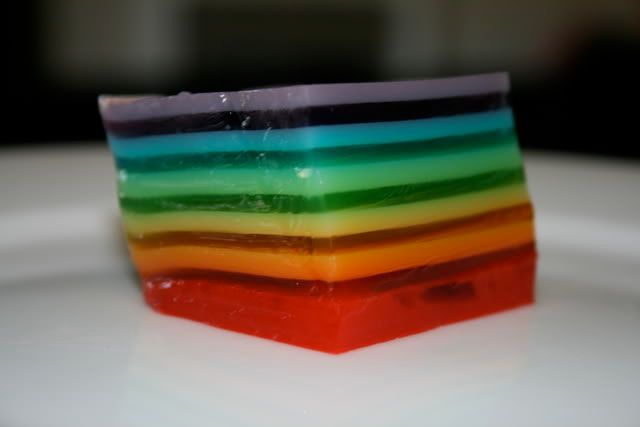
Rainbow Jello

So I discovered that this is something that I usually make for Thanksgiving. It was a good thing I was reminded, because I didn't know that. And actually, 80% of the people had made it though the line before I remembered to take it out of the fridge. I will say, kids really think it is cool when they see it. I even did this in individual clear plastic cups for one of my sons birthday treats at school.

This recipe is really pretty easy. Just a little time consuming. But if you are hanging around the house anyway, it is no biggie to just keep adding the next layer. They set up pretty quick. Give it a try... your kids/grandkids will think you are wonderful.


Rainbow Jello

6 small packages of Jello (red, orange, yellow, green, blue, purple)
16 oz. container of sour cream

I do this in a 9 X 13 pan which has a very light coating of cooking spray in it.
Add one packet of Jello to 1 cup of boiling water. Stir 2 to 3 minutes to dissolve completely. Pour 2/3 cup of the Jello into the prepared pan, and chill for 15 minutes. Meanwhile, add enough Sour Cream to the remaining Jello to make 2/3 cup. Stir until combined. When first layer has set for 15 minutes, carefully pour Jello/sour cream mixture over it, and chill for 15 minutes. Repeat with remaining colors. Once all layers have been poured, allow to chill for at least 2 hours. Unmold onto a serving platter, if desired, or cut into squares and serve.

Note: as soon as I pour (do it gently so as not to break up the previous layer)the sour cream/jello layer on, I mix the next color of jello up so it is cooled enough to pour when the sour cream/jello layer is set.

You can also use cool whip or evaporated milk instead of sour cream. Just follow the same measurements as above. I thought the cool whip was a pain to incorporate into the jello though.

You can also do this with whatever colors of jello you want for whatever special occasion. You can also do this in a bundt pan and unmold for a special affect.

Tuesday, June 23, 2009

Yummy Cornbread Casserole

I tried this at a wedding shower a few weeks ago. We had grilled steak, a lovely salad and this cornbread casserole. I personally never would have thought to serve a cornbread casserole with steak, but it went together very well. It also got rave reviews from both men and women. I got this recipe from my mother who got it from the couple who hosted the shower, the Iunkers.

If you want to try something new, see if it goes over as well as it did when I took it to our family dinner last Sunday. Even the kids liked it.


Cornbread Casserole

BATTER
2 eggs
1 cube butter
1/2 cup chopped sweet onion
1 can green chilies (small can)
1 box Jiffy corn muffin mix
1 can cream corn
1 can regular corn (strained)

TOPPINGS:
sour cream
1 1/2 cups cheese

Cream butter and add eggs. Mix until smooth, then add everything else and mix again until combined. Pour into a greased 9 X 13 pan. Put dollops of sour cream on top using a teaspoon. Then sprinkle the top with 1 1/2 cups of cheese (I used the grated Mexican cheese).

Cook at 350 degrees for 40 minutes. Serve warm. It is much tastier warm.

This is what the box of Jiffy corn muffin mix looks like. I found mine by the cake and muffin mixes at the grocery store.

Friday, July 4, 2008

Oven Baked Corn on the Cob

We were at a local town street fair and they were selling this heavenly smelling corn on the cob. It was also fun to see people carrying their cobs around by the husks which had been folded back into a handle. So of course we hunted down the source of this fun treat and paid a whopping $3 for an ear of corn. I felt for that much I should also get a few directions on how to do this at home. So I went behind the serving kiosk and talked to the oven tender (is that an official position, if so I need to hire one when I am toasting bread in the oven because I always burn it). He just takes the ears of corn out of the box and throws them in the oven for about 30 minutes. When they are done he takes a cob out, peels the husks down so you can hold your hot cob of corn with this makeshift handle. He then brushes off what is left of the silks and hands them to the seller who rolls it in butter and gives it to the customer (the oven tender told me that there is a lot of sugar in the silks and when you remove them prior to cooking you miss out on some great flavor). There were several things to sprinkle on besides the traditional salt and pepper. Our favorite was Johnnys seasoning. But they also had paremsan, paprika, lemon pepper and so on. It was really yummy.

So I decided to try it at home. I cooked it at 450 degrees for about 30 minutes and it came out perfect. The husks did get a little brown and there was a slight odor of burning husks in the house that was easy to get rid of. But how easy is that. You don't have to peel the corn anymore. Just throw it in the oven and cook away. Give it a try.


Picture is courtesy of the internet. I will post a real picture of my finished product next time we make it (which will hopefully be this week).


My husband said it was the best corn he had eaten and it was just from the grocery store. Imagie how divine to do it with fresh corn from your garden!

I read somewhere else that you can soak your corn a little before cooking so the husks don't burn, but I wonder if that would dilute the flavor. Something to try. Maybe we will try half soaked and half not and see what turns out better. Good Luck!