Showing posts with label main dish. Show all posts

Wednesday, November 14, 2012

Pesto Baked Chicken

This is what we had tonight (per request from my 10 year old). I like this because if you make your own or look really hard, you can find pesto sauce which is SCD compliant for my 17 year old. It is also VERY EASY to make, which you will like. I would also say that it is a nice enough dish to make for company. So, all pluses and no minuses.

I got it from this site (they have a picture too)....
http://www.kalynskitchen.com/2010/09/easy-recipe-for-baked-pesto-chicken.html
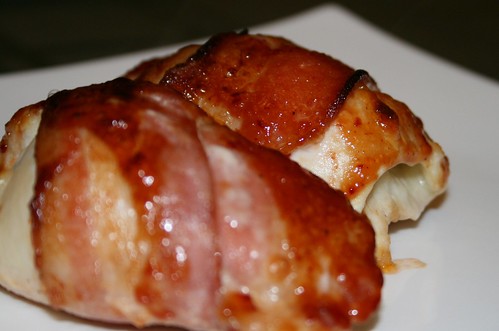
Pesto Baked Chicken

Ingredients: 4 boneless, skinless chickenn breasts
salt and fresh ground black pepper for seasoning chicken
1/2 cup basil pesto
2 oz. (1/2 cup) grated low-fat mozzarella cheese
Instructions:
Preheat oven to 375 degrees.Cut each chicken breast lengthwise into 2 or 3 pieces. 

Spray a 9" x 12" baking dish with non-stick spray, then spread 1/4 cup basil pesto over the bottom of the dish. Lay chicken strips over the pesto, then spread 1/4 cup more basil pesto over the chicken.

Cover the baking dish with aluminum foil and bake the chicken for 30 minutes, just until chicken is barely firm and cooked through. (Don't cook too much at this point, or the chicken will be overcooked by the time the cheese is melted and browned.)

When chicken is barely cooked through, remove foil and sprinkle chicken with 1/2 cup grated mozzarella cheese. Put dish back into the oven without foil and cook 5 minutes more, just until cheese is melted. After the cheese is melted for 5 minutes, switch oven to broil and broil for 5 minutes more, just long enough to get the cheese lightly browned.

Serve hot. There will be some flavorful juice in the bottom of the dish when this is done, so you may want to serve with rice, couscous, or quinoa to soak up the juice, but if you're eating this for phase one, just spoon the juice over the chicken.
 
I bought a container of pesto and didn't measure it all out. I put half on the bottom and spooned the rest over the top of the chicken. I then grated cheese over the top until it was all covered. So don't worry about measuring it all out, it will still turn out yummy.

Thursday, January 12, 2012

Brown Sugar and Balsamic Glazed Pork Loin

My family was slowly coming home one at a time as I finished fixing dinner. There was some talking and hanging out until I asked my husband to pull the pork out of the oven and cut it up. As soon as he took a nibble, which he is notorious, he said it was really good and told all the kids to come and eat because dinner was going to be good. That should tell you that this is worth trying.


  Brown Sugar and Balsamic Glazed Pork Loin
Ingredients:
1 (2 pound) boneless pork tenderloin (or regular pork loin)
1 teaspoon ground sage
1/2 teaspoon salt
1/4 teaspoon pepper
1 clove garlic, crushed
1/2 cup water

Glaze
1/2 cup brown sugar
1 tablespoon cornstarch
1/4 cup balsamic vinegar
1/2 cup water
2 tablespoons soy sauce

Directions:
Combine sage, salt, pepper and garlic. Rub over roast. Place in slow cooker with 1/2 cup water. Cook on low for 6-8 hours. About 1 hour before roast is done, combine ingredients for glaze in small sauce pan. Heat and stir until mixture thickens. Brush roast with glaze 2 or 3 times during the last hour of cooking. Serve with remaining glaze on the side.

The changes I made, was I used a 5.5 lb pork loin from Costco. When I took it out of the package I realized that it was 2 loins tied together with string. I cut the string off and rubbed each portion with the rub. For some reason my crockpot doesn't cook real quick, so I put the loins in an oven proof pot with a lid and cooked it in my oven at 300 degrees for about 5 hours. Then the last 30 minutes before serving, I mixed up the balsamic sauce in an microwave proof bowl, microwaved it for  1 1/2 minutes, stirred and microwaved it for another 1 1/2 minutes until it was thickened. I turned on my broiler and put the pot with the loins on the bottom rack, kept glazing and turning until it was a little brown and yummy looking. My husband then removed it, cut it and served it with the rest of the glaze... which is to die for. I would make the glaze for chicken too.

Texas Chicken Diablo

I think just the fact I cooked something with "diablo" in the recipe makes me cool. When the kids ask what is for dinner, don't you just want to say "Diablo Chicken" and then let them mull that over until dinner time?

I was a little nervous making this because of the jalapeno peppers. I have a 9 year old and a few picky eaters, and thought that they might not go over so well. So I did some chicken with the pepers and some just wrapped in bacon. The pepper ones were the hit. Next time I will do them all that way. Because the jalapeno peppers cook, they really become mild, with just a little kick. Not enough to bother my 9 year old. So give it a try and maybe make a few without, just in case.

I also thought these would be pretty time consuming to assemble and was surprised at how easy they were to make. I used whipped or softened cream cheese and just stirred in the steak seasoning and chopped pecans (which I bought already chopped) in a bowl. I think it only took me about 5 mintues to assemble 6 chicken breasts.


So here is the recipe and let me know how you liked it.

Texas Diablo Chicken

2 pounds chicken tenders
2/3 cup orange juice
1 1/2 tablespoons dry steak seasoning
8 ounces cream cheese
2/3 cup chopped Texas pecans
12 whole fresh jalapeños
2 pounds thin-sliced bacon
2 cups barbecue sauce

Place chicken tenders in bowl, add orange juice and 1 tablespoon steak seasoning, stir, cover and set in refrigerator to marinate 1 or more hours, but not overnight. In separate bowl, mix cream cheese, pecans and 1/2 tablespoon steak seasoning, blend well by hand, and set aside. When ready to assemble, wash and slice jalapeños in half lengthwise, remove seeds, then rinse again. Fill jalapeño half with cream cheese mixture, place chicken tender on top of filling, wrap with 1 slice of bacon, and secure with large grilling skewer so that bacon stays wrapped around jalapeño. Place three stuffed jalapeños on each skewer. When finished, brush all finished jalapeños generously with barbecue sauce. Bake or grill until chicken is thoroughly cooked, approximately 45 minutes to 1 hour at 350 degrees, turning halfway through cooking time and basting with more sauce. Baste one last time about 5 minutes before finishing cooking or use remaining sauce to serve.

Monday, November 7, 2011

White Chicken Chili

This is a recipe that a friend brought to the same baby shower that I made the caramel apple bars (see below). It was good enough that I requested the very next day.What I like about this chili, the taste is really good and the additions of melting the cheese and sour cream at the end gives is a creamy consistency. It goes together pretty quickly.


White Chicken Chili
(adapted from "The Food Nanny Rescues Dinner" by Liz Edmunds


 1 lb. boneless, skinless chicken breasts (cooked and diced)
1 T. olive oil
1 small white onion, diced
3-4 cloves garlic, minced
1 small can diced green chiles, drained
2 - 15oz. cans white beans, drained
4 c. water
4 t. "Better Than Bouillon" chicken base
2 t. ground cumin
2 t. dried oregano
1/2 to 1 t. cayenne pepper (I used these amount of spices - it was just the right amount, spicy but not too much so)
1 t. salt
1 c. sour cream
2 c. shredded Monterey Jack cheese
  chopped tomato
  chopped cilantro
  diced avocado

Heat oil in large pan over medium heat.  Add the onion and garlic, and cook and stir until the onion is translucent, 2-3 minutes.  Add the chicken, chiles, beans, chicken base mixed with water, cumin, oregano, and cayenne.  Simmer 30 - 45 minutes.  Add the sour cream and cheese, and continue cooking until the cheese is melted.  Keep warm until serving.  Serve in bowls and top with tomatoes, avocado, and cilantro.

Edited: I baked 3 chicken breasts and shredded them for my chicken. Ialso used 2 more cups of water and 2 more tsp of chicken base. I wanted my chicken chili to be between a soup and a chili consistency. I also only used 1/8 tsp cayenne pepper since I was serving it to my kids. I figured I could add more later, but thought it had the right amount of kick.

This is definitely going in my stack of favorites! We served our with these mozzarella, pesto, bacon and tomato paninis (recipe HERE).

Thursday, June 16, 2011

Honey Sesame Chicken


Saw this recipe a few weeks back and put it on my list of things to try. We like chinese food, but

1. hate the prices (when you are feeding a family of 6, 2 being full grown men/boys) and

2. sometimes it can be really fattening or the chicken can be a little junky.

What I loved about this recipe... the taste.

What I didn't love.... coating and frying all the chicken pieces.

When I try this again, I think I will cut my chicken into pieces and then just cook them in a pan with a little olive oil. Remove the chicken, make the sauce, replace the chicken in the pan to coat with sauce. Then serve over rice. This makes the recipe much easier (don't you hate the smell in your kitchen after frying stuff) and much healthier. Yes, the crunchy battered coating is delicious, but if you are lazy like me, this is a good alternative. Or maybe I should say I am looking for a healthy alternative. Doesn't that make me sound more posh?

The sauce was easy and very tastey. I cut the oil down by half and doubled it as I wanted enough sauce to drizzle over on the rice when serving. I actually doubled the recipe, so really I quadrupled the sauce recipe.

Honey Sesame Chicken

Ingredients:

1 ½ lbs boneless skinless chicken breasts (cut into 1” chunks)
Oil (for deep frying)

Batter-
4 tablespoons cornstarch
¼ cup flour
1 teaspoon baking powder
½ cup water
½ teaspoon salt
1 egg
1 egg white

Sauce-
1 ½ tablespoons oil
2 teaspoon ginger (minced)
3 tablespoons garlic (minced)
1 teaspoon salt
3 tablespoons honey
1 teaspoon rice wine vinegar
½ cup water
1 teaspoon cornstarch (mixed with 1 teaspoon water)
Sesame seeds (for garnish)

Step 1: In a large bowl mix all batter ingredients together until smooth. Cover and allow the batter to site for at least 30 minutes. Add the chicken to the batter tossing to coat.

Step 2: Heat a deep fryer to 350 degrees. Fry chicken bits in patches for 2 minutes or until batter becomes firm. Drain on paper towels.

Step 3: To make the sauce. Heat 1 ½ tablespoons of oil in your wok. Add garlic and ginger and stir fry for 30 seconds. Add salt, honey, vinegar, and water. Mix well. Combine 1 teaspoon of water with 1 teaspoon of cornstarch. Add to the sauce and Simmer for 2 minutes.

Step 4: Coat chicken with the sauce and garnish with sesame seeds. Serve with white rice.
(Makes 4 servings)

Tuesday, June 14, 2011

Steak or Chicken Fajitas

(picture borrowed from ourbestbites.com)

This recipes comes from one of my favorite food blogs ourbestbites.com. I've made it twice and the hubs has raved both times. He said if he closed his eyes he felt like he was eating fajitas at a good restaurant. I think it's especially delicious because you marinade the meat (I used chicken) and vegetables beforehand and then grill them all which adds a lot of yummy flavor. If you are a fan of Mexican food, I would definitely give this recipe a try!

Chicken or Steak Fajitas

Measurements of meat and vegetables are approximate. Adjust depending on your preference and the number of people you’re serving. This will serve about 4-6.

1 lb boneless skinless chicken breasts, chicken thighs, or steak
2-3 bell peppers, stem and membranes removed and peppers quartered
1 large onion (any color/variety) sliced into 1/2″ slices
Marinade:
1/4 C fresh lime juice
1/3 C water
2 T vegetable oil
2 cloves garlic, pressed or finely minced
3 t vinegar
2 t soy sauce
1-2 t liquid smoke*
1 t salt
1/2 t chili powder, or chipotle chili powder
1/2 t cayenne pepper
1/4 t ground black pepper
1/4 t onion powder

*If you’re not familiar with liquid smoke, you can find it near the bbq sauces. Don’t make this without it! It’s definitely one of the key components. It makes things yummy and smoky and super flavorful. And if you’re wondering, it actually is real smoke in liquid form. Interesting, eh?

Place meat in a zip-top bag or shallow dish. Place vegetables in another. In a medium bowl, combine all marinade ingredients and whisk well. Reserve 3-4 Tablespoons of marinade for later use. With remaining marinade, add a splash to the vegetables (enough for a light coating) and the remaining to the meat. Marinate for 4-6 hours and up to overnight.

Preheat bbq grill (my preference), indoor grill pan, or large skillet. If you’re using a grill, place everything on at the same time. If using a skillet, slice peppers and onions first. Cook chicken for a few minutes on each side until cooked through and remove from pan. Cover with foil to keep warm. Add vegetables and cook until crisp tender.

Remove vegetables from cooking surface and slice. Slice meat. Toss with reserved marinade and serve along side any or all of the following:

Flour Tortillas
Black Beans
Lime-Cilantro Rice
Pico de Gallo
Salsa
Diced avocado
Guacamole
Sour Cream (sorry, we just buy that one!)

Tuesday, May 17, 2011

Traditional Chicken Enchiladas

Matt and I have been on the search for a couple years for a great Enchilada recipe similar to the one we have at our favorite mexican restaurant. It doesn't have the red or green enchilada sauce, it's a more of a white sauce but we couldn't figure out what it was. I've seen the recipes using cream cheese and we knew that wasn't it either...there is no hint of cream cheese in our favorites. I finally came across this recipe one day and gave it a go. We both agreed it was the closest thing we've had to the ones at the actual restaurant and we really liked them! This will be our go to enchilada recipe from now on! This picture is from the website (http://www.mexicanfoodrecipes.org) I got the recipe from as I've been having issues with transferring pictures from my camera to my computer.

Traditional Mexican Chicken Enchiladas Recipe

Ingredients -
12 corn tortillas
3 cooked chicken breast halves, no bones or skin, shredded
½ cup chopped green onions
½ cup chopped fresh cilantro
2 cups chicken broth
1 cup sour cream
¾ cup minced onion
12 oz shredded cheddar cheese
4 oz chopped green chilies
¼ cup butter
¼ cup all purpose flour
Vegetable oil for frying

Preparation:

Preheat the oven to 375ºF. Heat 2 tablespoons of oil in a large frying pan over a medium high heat, and then fry the tortillas on 5 seconds per side until they are pliable. Do them individually and add more oil as required. Drain the tortillas on paper towels and keep them warm.

Divide the chicken, onion (not green onion) and 10 oz of the cheese between the tortillas. Roll them up and place in a greased baking pan, seam side down. Melt the butter in a pan over a medium heat. Add the flour and whisk until it begins to boil. Add the broth, stirring continuously.

Add the chilies and sour cream. Stir occasionally and do not let the mixture boil. Pour this mixture over the enchiladas when hot and thick. Bake the Mexican chicken enchiladas for 20 minutes then top with the rest of the cheese and bake for a further 5 minutes. Use the green onions and cilantro to garnish them.

Serves 6


PS- I kept my promise Lorri! Are you proud?!

Friday, May 6, 2011

Bread Cones

I saw this recipe awhile ago and bookmarked it for further exploration later. For some reason, this seems like such a fun spring idea. Maybe making the cones and putting some delcious chicken salad in them. I can see a picnic or luncheon with the ladies. The one thing about this recipe is that they use small metal cones to wrap the dough around. I don't know about you, but I loaned all my fancy metal cones out and never got them back (okay, I never really had any to start). I did find that one suggestion was to use sugar ice cream cones and wrap foil around them, THEN wrap your dough around the foil. Another woman tried using cardstock (she used old brochures mailed to her). She wrapped them in the shape of a cone and then wrapped the foil around them. Then wrapped her dough around the cone. She said it worked fine. So now I have given you some inexpensive options. Here is the recipe below, and cookingbread.com is the site the hosted it. They have detailed step by step directions with pictures. Which makes it a little easier I think. Also, HERE is the recipe card version.

Bread Cones:

Ingredients

Dough:

  • 1/2 cup milk
  • 1/2 cup water
  • 3 tablespoons oil
  • 1/4 cup sugar
  • 1 beaten egg
  • 1 1/2 teaspoon salt
  • 2 1/4 teaspoon instant yeast
  • 3 1/2 to 4 cups bread flour

Egg Wash:

  • 1 egg
  • 1 tablespoon milk

Method

Pour milk and water into a saucepan and heat to a scald. Pour this into a large bowl, allow to cool to lukewarm. Add in oil, sugar and salt; mix with a wooden spoon till well blended. Add in beaten egg and 2 cups of flour; mix till smooth with a wooden spoon. Add in instant yeast and mix. Allow to sit for 10 minutes uncovered. Now, start to slowly add in more flour. When the mixture becomes to hard to mix, pour out onto a well floured surface and knead in more flour for 8 minutes. The dough will become smooth and elastic. Add just enough flour that the dough no longer sticks to your hands while kneading. Add a tablespoon of oil to a clean bowl and place the dough into the bowl. Turn over a few times to lightly coat all sides with oil. Cover with plastic wrap and allow to rest till double in bulk, about 1 hour. Remove dough and knead a few time to release the gas. Now cut the dough into 8 pieces. use a scale to make sure each piece is equal in weight. Allow to rest for 5 minutes. Take each piece and roll into a 36 inch rope. Roll ropes around the greased 6 inch cream horn tubes. Place onto a cookie sheet lined with parchment paper and cover with plastic wrap. Allow to rest for 30 minutes. Bake in a preheated 350 degree oven for 20 - 22 minutes or till golden brown. Place onto a wire rack and allow to cool for a couple minutes before removing the tubes.

I would be curious if you could take this same technique and maybe try it with your favorite dough. If anyone does this, let us know how it works. Good Luck!

Monday, May 2, 2011

Island Pork

Yes, I know you thought we had all died and no one was manning the blog.

BUT, this weekend I spent some time with my sisters and they are

COMMITTED

to putting at least one new recipe on each month. Funny thing was, my one sister kept telling us all these wonderful, delicous recipes that she had made that were definitely blog worthy. Hmmm, holding out on us?

So here is a new contribution. My mother-in-law brought this recipe back from Utah. I believe she got it from my sister-in-law who got it from someone and so on. It was delicious. It is also one of those recipes that you put in in the morning and when it is time for dinner, and life is scattered and falling apart, you have a warm yummy meal for your family.

Island Pork

2 lb Pork Tenderloin

Season with:
2 tsp salt
1/2 tsp pepper
1 tsp cumin
1 tsp chili powder
1 tsp cinnamon

Sear seasoned pork in 2 tablespoons of oil in a frying pan.

Mix the following together and rub over tenderloin.
1 cup packed brown sugar
2 tablespoons chopped garlic
1 tablespoon tabasco sauce

Bake in covered pan at 300 degrees for 3-4 hours (or place in crockpot and cook for 6-8 hours).
Pull apart and serve with coconut rice and mango.

Coconut Rice

2 cups rice (can be white or brown, I prefer Jasmine)
1 1/2 cups water
1 can coconut milk (can be found in ethnic section)
1/3 cup of sugar (or more to your taste)

Cook for 15 minutes. Turn off stove and let sit for 10 more minutes or until done.

Serve rice with Island Pork topped with fresh mango. YUM!

I don't have a picture yet, due to the fact I haven't made it. My mother-in-law served it at our family dinner. I then requested the recipe and have it on my list of things to make the end of this week or beginning of next. So watch for it :)

Tuesday, November 9, 2010

Cranberry Chicken

I think everyone has this recipe. If you don't, then you can thank me later for letting you "in" the loop. I made this for approximately 40 ladies at a Christmas dinner. It is pretty full proof and very tastey.


Cranberry Chicken

1 (16 oz) can whole cranberry sauce
1 (8 oz) bottle French dressing
1 envelope onion soup mix
8 boneless, skinless chicken breasts

Heat oven to 350 degrees. Combine cranberry sauce, dressing, and soup mix. Place chicken breasts in a greased 3 quart casserole dish or a 9 x 13 baking dish. pour mixture over chicken and bake uncovered 45 - 60 minutes. Serves 8.

Cream Cheese Chicken and Vegetable Soup

Yep, another soup. It is cold and rainy here. I have 4 loaves of bread in the oven and this soup on the stove. Very creamy and hearty.

I used my bottled chicken instead of cooking some chicken breasts.


Cream Cheese Chicken and Vegetable Soup

2 tablespoons butter
1 yellow onion, finely diced
2 cloves garlic, finely minced
2 stalks celery, diced
1/2 cup diced carrots (about 2 regular carrots or a handful of baby carrots)
3 cups chicken broth
2-3 potatoes, peeled and finely diced (I like to leave the peels on red potatoes, if using them)
1 cup milk (1% is my milk of choice)
4 tablespoons flour
1 (8 oz. package) regular or light cream cheese
2-3 (about 1 pound) boneless, skinless chicken breasts, cooked and diced

In a large pot, melt the butter and add the onion, garlic, celery and carrots. Saute, stirring often, for 3-4 minutes, until the veggies are slightly tender and the onions are translucent. Add the chicken broth and potatoes. Bring the soup to a simmer and cook, partially covered, until the potatoes are tender, about 10 minutes. In a liquid measuring cup, vigorously whisk the flour and milk together until smooth. Whisk the mixture into the soup, stirring quickly, and cook over medium heat for 3-4 minutes, until the soup begins to thicken slightly. Stir often to ensure the soup doesn’t burn. Soften the cream cheese in the microwave until it is very soft/melty. I usually place the unwrapped cream cheese on a plate and microwave it for one minute at 30% power. I like it really, really soft so it doesn’t leave lumps in the soup. Add the cream cheese to the soup in small tablespoon-size pieces. Let the pieces sit in the soup and warm through then whisk or stir the soup until the cream cheese melts and mixes in well. Add the cooked chicken and heat through. Season with salt and pepper. Serve.

Tuesday, March 2, 2010

Chicken Enchilada Pasta

I was quickly trying to find something to make for dinner the other night, when I ran across this. I wasn't 100% convinced it would be good, but thought that we like pasta and we like enchiladas, so let's give it a go. It was easier than rolling and make enchiladas and tasted really good. Got compliments from my husband, but my 7 year old thought it might be a tad on the spicey side. We just put a little more sour cream on hers. I think if you were concerned, you could cut out 1 of the cans of green enchilada sauce and substitute with cream of chicken soup. This recipe made enough for dinner and then I put the rest in a covered dish to heat again in a couple of days. Hope you enjoy it as much as we did. Chicken Enchilada Pasta Serves 6-8 *Plan Ahead: the recipe calls for cooked chicken so use leftovers or plan enough time to cook the chicken beforehand. 2-3 chicken breasts, cooked and cubed or shredded 2 tablespoons olive oil 2 garlic cloves, finely minced 1 medium onion, diced 1 red pepper, diced 4-ounce can diced green chilies 1/2 teaspoon salt 2 teaspoons chili powder 1 teaspoon cumin 2 (10-oz) cans green chili enchilada sauce (I used mild) 2/3 cup red enchilada sauce (I used mild) 1 can large black olives, cut in half 1 cup sour cream 1 1/2 cups shredded cheese (I used sharp cheddar) 16-20 oz. penne pasta (Depending on how "saucy" you want the pasta) Bring a large pot of water to a boil. Cook the pasta until tender. While the pasta is cooking, heat the oil in a large nonstick skillet and add the onion. Cook for 2-3 minutes until onion is translucent. Add the garlic and red pepper and cook for another 2 minutes, until pepper is barely tender. Add the cooked chicken, green chilies, spices, enchilada sauces and olives. Let the sauce simmer for about 8-10 minutes. Add the sour cream and cheese and heat through, until the cheese is melted (but don't boil!). Pour the sauce over the hot pasta. Garnish with extra sour cream, cheese, diced tomatoes, green onions or crushed tortilla chips. BTW, I got this from My Kitchen Cafe. Hope it was okay that I used her picture

Sunday, August 2, 2009

Pizza on the grill

I attended a class on herbs presented by a woman from our church. One of the recipes she demonstrated was this pizza on the grill. It was quick, easy and delicious. I have been wanting to share it for a bit, but life has kept up a steady pace. Give this recipe and try and let me know how it turned out and what toppings you decided to use.

PIZZA ON THE GRILL

Pizza dough - if you live close to a Winco, they sell premade pizza dough by the deli section. It is approximately 1.98 for a slightly larger than gratefruit size. Another one I like is the "Jiffy" pizza dough you can make from the box, or you can use whatever your favorite pizza dough is (google pizza dough for lots of recipes).

Sauces - Olive oil with garlic, traditional pizza sauce, pesto, barbeque sauce, alfredo sauce.

Toppings - grilled chicken sliced, shrimp, fresh mozarella, basil, tomato slices, artichoke hearts, olives, sausage, pepperoni, onion slices and anything else your mind can imagine.

DIRECTIONS:
Roll pizza dough out until desired thickness. Try your first one about 1/8" thick and then adjust to your liking. Brush a with a small amount of olive oil. Take it out and grill it on one side. Your grill should be med to med-low.


You know it is ready when it gets grill marks on the side that is down and it looks partially cooked (this is why you don't want your dough to thick or it won't cook through before it needs to be removed so it won't burn).


Remove from grill and add whatever toppings you want. The toppings above are just some suggestions, but you are only limited by your imagination.
I put pesto, shrimp in half and chicke on the other, some fresh basil leaves and fresh mozarella finally topped with fresh sliced tomato. YUM!


These are some of my kids creations. We make individual pizzas so each person can taylor make it to their own tastes, plus how fun to do as a family.


After putting toppings on, put on cookie sheet to transfer back to grill. Place pizzas on grill and close lid so the toppings melt and cook together while dough finishes cooking through. Keep checking until toppings are done and the bottom has grill marks. Remove, let cool for a few minutes and serve.

This would be fun for a dinner party with everyone making their own pizza. Just put out a lot of toppings and pizza dough that has already been cooked on one side. These cook pretty quick (depending on thickness of dough) so it goes pretty fast.

Hope you enjoy this yummy summer dinner.

Friday, June 26, 2009

Cedar Plank Salmon with Honey Butter

Seriously, salmon has to be one of my favorite foods. I usually order it when we go out to eat. So when we had a "salmon off" (a cook off with my family) I thought I had the recipe to beat. Unfortunately, my sister Steff, won hands down with this recipe. Once you try it, you will never eat salmon any other way.

I am not sure who Steff got it from, but thank you from the bottom of my heart.


CEDAR PLANK SALMON WITH HONEY BUTTER

Butter
Honey
Montreal Steak Seasoning
Cedar Plank

Soak your cedar plank in water, preferably at least an hour before cooking. I have fudged it and have done it for 30 minutes with decent success. Place the salmon on the soaked cedar plank and begin heating your Barbeque while you mix your honey butter. When mixing the honey butter I usually do a ration of half and half, but you can play with it and see what you like best. Next slather (yes that is the technical term for it) the honey butter all over the salmon. I know it looks a little gross, but TRUST ME! You will love me forever.


Now sprinkle with the Montreal Steak Seasoning. I got a large container of it from Costco.


Place the plank with salmon on it onto the barbeque. I cook mine on medium heat, checking periodically to adjust temperature. Obviously when you have thicker you want to lower your temperature so they cook through. One big mistake most people make in cooking salmon is overcooking it. So watch it carefully. The plank will begin to smoke (and even burn away a little depending on how soaked you get it). Don't worry, where the salmon is should stay intact. I slightly undercook mine in the middle and then let it sit for a few minutes to finish it off. Remove from barbeque and enjoy. Heavenly! This could seriosly be the answer to world peace.

Thursday, June 25, 2009

Fish Tacos

I was browsing a few cooking blogs and came across this recipe for fish tacos. It just seemed like something I was in the mood for and decided to try it. They turned out pretty good, I would definitely make them again.


FISH TACOS

Talipia Fish Fillets
Cajun Seasoning
Salt Pepper

Pineapple Salsa (recipe below)
Lettuce
Avocado
Grated Cheese
Flour Tortillas

Prepare salsa and set aside for flavors to combined.

Grill talipia fillets on grill (or cook in a pan) seasoning with cajun seasoning, salt, pepper and a squeeze of lime juice. When cooked assemble tacos as follows...

Lay flour tortilla on place. Put shredded lettuce on flour tortilla, then top with pieces of fish. Put a couple of spoons of salsa on fish, then finish topping with whatever you like, cheese, avocado etc. Roll up and eat.

PINEAPPLE SALSA

1 8 oz can of pineapple chunks in juice, cut up smaller
1/2 cup cilantro, chopped
1/4 cup onion, finely diced
1 jalapeno, seeds and membrane removed and finely chopped
1/4 cup red pepper, finely chopped
juice of 1/2 lime
1/2 tsp cumin
1/2 tsp salt
1/4 tsp fresh ground black pepper

Mix all ingredients together and allow to chill in the fridge for about 1 hr before serving.

NOTES: I like to buy my Talipia from Costco. They sell it in the freezer section and the fillets are individually wrapped. It is a little pricey, but the fillets are very clean and white. Tilipia is a firm white fish. The cost at Costco is around 15.00 for 2.5 pounds.

I also like to eat it when I am trying to eat healthy. I will put a fillet in a pan that has been brushed with olive oil, cook it for a few minutes (before it starts to brown). Pour a little water in the pan, sprinkle the fillet with cajun seasoning, salt, pepper and lemon juice. Flip the fillet, put a lid on it, let it cook for a few minutes, then turn off heat. Let it finish cooking as it steams. I will then chop up part of a tomato and green onion and place on top of the fish. Replace lid and let it heat through. Sprinkle with garlic, more salt and lemon juice to taste. Very healthy and tastes very good.

Tuesday, June 23, 2009

Wayne Winter's BBQ Ribs

Have you ever watched the Food Network when they are talking about preparing ribs "just right". I feel intimidated just watching the show. Although this isn't your traditional cook on the grill ribs, it is full proof, and very yummy. If you like BBQ without the hassle, you should give this a try. Basically 4 ingredients (if you are counting salt and pepper separately) and you are done.

When you buy these ribs and are browning them, they will appear to have to much fat. Don't worry, as they cook the fat cooks off leaving mostly meat. They will be fall apart tender. You won't even need a knife to cut them up.


Wayne Winter's BBQ Ribs

INGREDIENTS:
country style spareribs (I get mine at Costco, they should be the boneless ones)
Salt and pepper
Bullseye BBQ Sauce (or whatever your favorite is)

Season spareribs with salt and pepper. Brown in a pan/dutch oven. Pour Bullseye Barbeque (or whatever you have chosen) over the top to coat spareribs (you will need to stir it a bit). Don't be stingy on the sauce. You might need more than one bottle depending on how many ribs you are doing and how big your BBQ sauce bottles are.

Bake at 280 - 300 degrees for 2 hours. Stirring half way through.

NOTES: I cut the spareribs into 3" or so pieces so they are easier to brown and when you are serving they are in more manageable size. I brown them in the same pan I do my Sunday roast, it just needs a good fitting lid and big enough to hold all your ribs. When you brown put some oil in the bottom first and add more if needed. I brown my ribs in batches. I do a batch, put them on a plate then do the next batch. When I am done I put them all back in and coat with the BBQ sauce, stir and put in the oven. How easy is that?

Friday, June 19, 2009

Smoke Alarm Chicken

This one is from my sister Steff (and I have no idea who she got it from). The bacon keeps your chicken breasts nice and tender. They call it smoke alarm chicken because you cook it on such a high temperature, there is a chance of smoke coming out of your oven. I did not have this problem, but if you do, it is a small price to pay for this tender deliciousness :)


SMOKE ALARM CHICKEN


boneless chken breasts
sage
salt & pepper
string cheese
bacon slices

Pound chicken breasts until evenly flat (I put my chicken breasts in a gallon size bag and then pound them so I don't get raw chicken goo all over everything). sprinkle with sage, salt and pepper on both sides. Cut a piece of string cheese, pull apart and spread on chicken. Roll up, tucking in ends. Wrap a slice of bacon around the chken securing with toohtpicks (not colored). Put on rack in a shallow baking dish. ake at 500 degrees (yes that is the correc tempeature) fo 8 minutes, turn over and bake another 8 minute. Serve.

Note: Mine takes a little longer to cook, so you may want to check them before considering done.

Wednesday, May 13, 2009

Chicken Lettuce Cups

I've recently become a fan of the show "Guy's Big Bite" on the Food Network. Okay, I became a fan after I watched it once and he happened to make this recipe and I really liked it. I got on the website and it had great reviews and I tried it and we thought it was pretty tasty. So...here ya go. (Here's the link to the recipe on the actual Food Network website just in case you don't trust me... http://www.foodnetwork.com/recipes/guy-fieri/chicken-lettuce-cups-recipe/index.html)


Chicken Lettuce Cups

Recipe courtesy Guy Fieri

Prep Time: 40 min
Cook Time: 2 min
Serves: 6 servings

Ingredients
1 tablespoon oil
1 small carrots, diced
1/2 celery rib, diced
1/2 red bell pepper, diced
5 snap peas, diced
1/2 cup diced red onion
1/2 cup mung beans, cut in 1/2 (I just used bean sprouts chopped up)
2 chicken breast, diced
6 ounces Apricot Sesame Sambal Szechwan Sauce, recipe follows
5 fried wonton skins
6 iceberg lettuce leaves
2 tablespoons diced green onions
2 tablespoons crushed, unsalted peanuts
Black sesame seeds, for garnish

Directions
In a medium saute pan over high heat, add oil.
Add vegetables, and chicken, saute for 45 seconds. Deglaze with sambal sauce for 30 seconds.

Add wonton to lettuce cup, pour chicken and veg mix into cup, top with green onions and peanuts. Garnish lettuce cups with black sesame seeds.

Ingredients
Apricot Sesame Sambal Sauce:
1/2 cup soy sauce
3 tablespoons minced garlic
3 tablespoons minced ginger
3 tablespoons sambal hot sauce (I couldn't find this so I left it out as suggested by some of the reviews)
3 tablespoons apricot preserves
1/4 cup rice wine vinegar
3 tablespoons hoisin sauce
1 teaspoon minced cilantro
2 teaspoons sesame seeds
1 teaspoon sesame oil

Directions
Mix all ingredients thoroughly. Shake before serving.

Ranch House Crockpot Pork Chops with Parmesan Mashed Potatoes

I saw this recipe on picky-palate.com and decided to give it a go. I must say it got two thumbs up from all who reside in my house. I guess that would actually be 8 thumbs up but whatever. Just try it. It may not be the healthiest recipe but it is worth it! ;)

I stole this picture off the Picky Palate website because my picture didn't look quite as tasty as hers. I hope that is okay and I don't get arrested or something. Ranch House Crockpot Pork Chops with Parmesan Mashed Potatoes

6 pork chops, 1/2 inch thick

1 packet dry Ranch Dressing Seasoning

10 oz can Cream of Chicken Soup

4 lbs peeled, cubed potatoes

5 Tablespoons real butter

1 Cup fresh grated Parmesan cheese

6 cloves roasted garlic (directions how to roast garlic below)

1- 1 1/2 Cups warm skim milk (any milk will do, I just happened to use skim)

1 Tablespoon salt, or to taste

1 teaspoon fresh cracked black pepper, or to taste

1. Place pork chops, Ranch seasoning and soup into a medium sized crock pot over high heat for 4 hours or low heat for 6 hours.

2. Place potatoes into a large pot of cold water. Place onto stovetop over high heat and bring to a boil. Once water is boiling, cook for 10-12 minutes or until potatoes are fork tender. Drain and transfer to the work bowl of a stand or electric mixer. Mix on low until potatoes are mashed then add butter, parmesan, garlic, milk, salt and pepper. Season to taste if needed. For thinner mashed potatoes add more milk, slowly until your desired consitency.

3. Scoop mashed potatoes onto serving plates and top with pork chops and soup gravy from crock pot. Eat!

Roasted Garlic

Preheat oven to 350 degrees F. Place bulb of garlic with skins on, wrap lightly in tin foil and bake for 1 hour. Remove from foil and let cool for 15 minutes. Remove garlic from skins, place in a bowl and mash with a fork until completely mashed.

Saturday, May 2, 2009

Southwest Chicken Salad


1 (16 oz) bag frozen corn
2 large chicken breasts or 4 regular sized (I used 4 frozen ones from Costco)
1 can black bans, rinsed and drained
1 jar of MEDIUM salsa (or hot, but not mild, mild will lose all flavor while cooking)
1 bag corn chips

Garnish with any of the following:
sour cream
shredded cheese
cilantro
avacado
salsa
tomato
onion
lettuce

Place corn on bottom of a crock pot. Follow with chicken breasts. Top with black beans and salsa. Cook in crock pot on high for 5 hours. Remove chicken and shred with forks. Place shredded chicken back in crock pot and mix with corn and beans. Place a handful of chips on plate and slightly crush with the palm of your hand. Place a good sized portion of chicken mixture on top of chips and garnish as you'd like. This really needs the chips to bring all the flavors together. The saltiness of the chips makes it so yummy! Reheats well. You can also you torilla chips instead of corn chips.

This was a once shot picture. Just as I was ready to try another angle my battery went dead. So hopefully the first one was good enough for you to get an idea of what this looks like. My family really enjoyed it, not to mention it was nice to throw together this morning and have something warm and substantial to feed them for dinner.