Seriously, salmon has to be one of my favorite foods. I usually order it when we go out to eat. So when we had a "salmon off" (a cook off with my family) I thought I had the recipe to beat. Unfortunately, my sister Steff, won hands down with this recipe. Once you try it, you will never eat salmon any other way.
I am not sure who Steff got it from, but thank you from the bottom of my heart.
CEDAR PLANK SALMON WITH HONEY BUTTER
Butter
Honey
Montreal Steak Seasoning
Cedar Plank
Soak your cedar plank in water, preferably at least an hour before cooking. I have fudged it and have done it for 30 minutes with decent success. Place the salmon on the soaked cedar plank and begin heating your Barbeque while you mix your honey butter. When mixing the honey butter I usually do a ration of half and half, but you can play with it and see what you like best. Next slather (yes that is the technical term for it) the honey butter all over the salmon. I know it looks a little gross, but TRUST ME! You will love me forever.
Now sprinkle with the Montreal Steak Seasoning. I got a large container of it from Costco.
Place the plank with salmon on it onto the barbeque. I cook mine on medium heat, checking periodically to adjust temperature. Obviously when you have thicker you want to lower your temperature so they cook through. One big mistake most people make in cooking salmon is overcooking it. So watch it carefully. The plank will begin to smoke (and even burn away a little depending on how soaked you get it). Don't worry, where the salmon is should stay intact. I slightly undercook mine in the middle and then let it sit for a few minutes to finish it off. Remove from barbeque and enjoy. Heavenly! This could seriosly be the answer to world peace.
Friday, June 26, 2009
Thursday, June 25, 2009
Fish Tacos
I was browsing a few cooking blogs and came across this recipe for fish tacos. It just seemed like something I was in the mood for and decided to try it. They turned out pretty good, I would definitely make them again.
FISH TACOS
Talipia Fish Fillets
Cajun Seasoning
Salt Pepper
Pineapple Salsa (recipe below)
Lettuce
Avocado
Grated Cheese
Flour Tortillas
Prepare salsa and set aside for flavors to combined.
Grill talipia fillets on grill (or cook in a pan) seasoning with cajun seasoning, salt, pepper and a squeeze of lime juice. When cooked assemble tacos as follows...
Lay flour tortilla on place. Put shredded lettuce on flour tortilla, then top with pieces of fish. Put a couple of spoons of salsa on fish, then finish topping with whatever you like, cheese, avocado etc. Roll up and eat.
PINEAPPLE SALSA
1 8 oz can of pineapple chunks in juice, cut up smaller
1/2 cup cilantro, chopped
1/4 cup onion, finely diced
1 jalapeno, seeds and membrane removed and finely chopped
1/4 cup red pepper, finely chopped
juice of 1/2 lime
1/2 tsp cumin
1/2 tsp salt
1/4 tsp fresh ground black pepper
Mix all ingredients together and allow to chill in the fridge for about 1 hr before serving.
NOTES: I like to buy my Talipia from Costco. They sell it in the freezer section and the fillets are individually wrapped. It is a little pricey, but the fillets are very clean and white. Tilipia is a firm white fish. The cost at Costco is around 15.00 for 2.5 pounds.
I also like to eat it when I am trying to eat healthy. I will put a fillet in a pan that has been brushed with olive oil, cook it for a few minutes (before it starts to brown). Pour a little water in the pan, sprinkle the fillet with cajun seasoning, salt, pepper and lemon juice. Flip the fillet, put a lid on it, let it cook for a few minutes, then turn off heat. Let it finish cooking as it steams. I will then chop up part of a tomato and green onion and place on top of the fish. Replace lid and let it heat through. Sprinkle with garlic, more salt and lemon juice to taste. Very healthy and tastes very good.
Tuesday, June 23, 2009
Wayne Winter's BBQ Ribs
Have you ever watched the Food Network when they are talking about preparing ribs "just right". I feel intimidated just watching the show. Although this isn't your traditional cook on the grill ribs, it is full proof, and very yummy. If you like BBQ without the hassle, you should give this a try. Basically 4 ingredients (if you are counting salt and pepper separately) and you are done.
When you buy these ribs and are browning them, they will appear to have to much fat. Don't worry, as they cook the fat cooks off leaving mostly meat. They will be fall apart tender. You won't even need a knife to cut them up.
Wayne Winter's BBQ Ribs
INGREDIENTS:
country style spareribs (I get mine at Costco, they should be the boneless ones)
Salt and pepper
Bullseye BBQ Sauce (or whatever your favorite is)
Season spareribs with salt and pepper. Brown in a pan/dutch oven. Pour Bullseye Barbeque (or whatever you have chosen) over the top to coat spareribs (you will need to stir it a bit). Don't be stingy on the sauce. You might need more than one bottle depending on how many ribs you are doing and how big your BBQ sauce bottles are.
Bake at 280 - 300 degrees for 2 hours. Stirring half way through.
NOTES: I cut the spareribs into 3" or so pieces so they are easier to brown and when you are serving they are in more manageable size. I brown them in the same pan I do my Sunday roast, it just needs a good fitting lid and big enough to hold all your ribs. When you brown put some oil in the bottom first and add more if needed. I brown my ribs in batches. I do a batch, put them on a plate then do the next batch. When I am done I put them all back in and coat with the BBQ sauce, stir and put in the oven. How easy is that?
Yummy Cornbread Casserole
I tried this at a wedding shower a few weeks ago. We had grilled steak, a lovely salad and this cornbread casserole. I personally never would have thought to serve a cornbread casserole with steak, but it went together very well. It also got rave reviews from both men and women. I got this recipe from my mother who got it from the couple who hosted the shower, the Iunkers.
If you want to try something new, see if it goes over as well as it did when I took it to our family dinner last Sunday. Even the kids liked it.
Cornbread Casserole
BATTER
2 eggs
1 cube butter
1/2 cup chopped sweet onion
1 can green chilies (small can)
1 box Jiffy corn muffin mix
1 can cream corn
1 can regular corn (strained)
TOPPINGS:
sour cream
1 1/2 cups cheese
Cream butter and add eggs. Mix until smooth, then add everything else and mix again until combined. Pour into a greased 9 X 13 pan. Put dollops of sour cream on top using a teaspoon. Then sprinkle the top with 1 1/2 cups of cheese (I used the grated Mexican cheese).
Cook at 350 degrees for 40 minutes. Serve warm. It is much tastier warm.
This is what the box of Jiffy corn muffin mix looks like. I found mine by the cake and muffin mixes at the grocery store.
Friday, June 19, 2009
Bran Muffins
We are attempting to eat a little healthier around our house. When going through my stack of favorite recipes, I found this little gem. This came from my Mom (again, not sure who she got if from) and I remember her making batches of these while us kids would eat them warm out of the oven.
The great thing about this recipe is that you can make a batch and cook them as you need them. Keep the dough in your fridge up to 6 weeks. Warm bran muffins each morning. Yum!
BRAN MUFFINS
2 cups. All Bran Muffins Cereal
2 cups boiling water
3 cups sugar
1 heaping cup shortening
4 eggs
1 quart buttermilk
5 cups flour
5 teaspoons baking soda
1 tablespoons salt
4 cups Nabisco Bran Cereal
Mix boiling water and 2 cups all bran cereal together and set aside. Cream shortening and sugar. Then add to the creamed mixture the buttermilk and eggs. In another bowl combined flour, soda and salt. Mix that into wet mixture. Add the 4 cups of Nabisco Bran and combine well. Fold in the All Bran and boiling water in last.
Pour into muffin tins and bake at 400 degrees for 15-20 minutes. Can leave in fridge up to 6 weeks. I made 1/2 a batch and so far have gotten 24 muffins with about another batch of 12 to go.
NOTES:
I subbed 1/2 a cup of applesauce for half of the shortening to lighten it up a little.
I also used 4 cups of All Bran instead of the 4 cups of Nabisco Bran because that was all I had on hand.
Last sub was milk with lemon juice instead of buttermilk. You need to add either lemon juice or white vinegar 1 tablespoon to each cup of milk.
Next time I will try doing all applesauce and no shortening. I also am considering trying half fresh ground wheat flour and half white flour. Just some ideas to try. Hope you enjoy it as much as we do.
Smoke Alarm Chicken
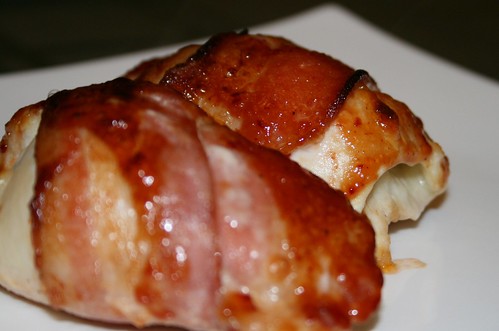
This one is from my sister Steff (and I have no idea who she got it from). The bacon keeps your chicken breasts nice and tender. They call it smoke alarm chicken because you cook it on such a high temperature, there is a chance of smoke coming out of your oven. I did not have this problem, but if you do, it is a small price to pay for this tender deliciousness :)
SMOKE ALARM CHICKEN
boneless chken breasts
sage
salt & pepper
string cheese
bacon slices
Pound chicken breasts until evenly flat (I put my chicken breasts in a gallon size bag and then pound them so I don't get raw chicken goo all over everything). sprinkle with sage, salt and pepper on both sides. Cut a piece of string cheese, pull apart and spread on chicken. Roll up, tucking in ends. Wrap a slice of bacon around the chken securing with toohtpicks (not colored). Put on rack in a shallow baking dish. ake at 500 degrees (yes that is the correc tempeature) fo 8 minutes, turn over and bake another 8 minute. Serve.
Note: Mine takes a little longer to cook, so you may want to check them before considering done.
Subscribe to:
Posts (Atom)
-
Does it ever amaze you how you can be married for 25 years and then, out of the blue you find out something about your spouse you never knew...
-
Is it good for you? No. Is it tastey... absolutely! I heard from a wife a church that this was one of her husband's favorites. So of cou...
-
The recipe is not for the faint hearted, don't even bother making them is you are worried about keeping track of calories, on the plus s...